Let's program the robot I built in the previous article!
The Eyepot works by using in conjunction a Raspberry Pi Zero W and an Arduino Pro Mini connected by a serial link. Therefore, we'll write the Arduino code first, then a Python program for the Raspberry Pi. Then, we'll setup remote control from a web browser.
You can find the entire source code for the project licensed under GPLv3 on my repository on GitHub.
The finished Eyepot moving
Arduino program
The Arduino Pro Mini is responsible for driving the eight servos of the legs. Commands to specify target angles are sent from the Raspberry Pi through a serial link.
The custom serial protocol is text-based and quite simple. It can easily be typed manually when debugging, but it is still compact enough to allow short transmission times even at low bitrates. Each line contains a one-character command, an optional space, and an optional parameter as a base-10 integer. Implemeted commands are as follows:
- 0 to 7: store target angle for corresponding servo (0 to 7)
- R: reset stored target angle to default for each servo
- C: commit stored target angles (apply the stored angle for each servo)
So, for instance, the commands to move one leg, whose hip and knee servos are respectively connected to pin 0 and 4, is:
090
445
C
The Arduino program reads commands on the serial and applies them. The servos default positions are defined so the robot is standing, and the program also features tunable offsets to precisely set the center position of each servo.
#include <Servo.h>

// ---------- Pin setup ----------
const int servoPins[8] = {5, 6, 7, 8, 9, 10, 11, 12};
const int offsetAngles[8] = { 0, 0, -10, -5, -10, 5, 10, -5 };
const int defaultAngles[8] = { 135, 135, 45, 45, 90, 90, 90, 90 };

Servo servos[8];
unsigned int angles[8];

String inputString = "";

void setup()
{
    // Init serial
    Serial.begin(9600);

    // Init servos
    for(int i = 0; i < 8; ++i)
    {
        angles[i] = defaultAngles[i];
        servos[i].attach(servoPins[i]);
        servos[i].write(offsetAngles[i] + angles[i]);
    }
}

void loop()
{
    // Read commands on serial
    while(Serial.available())
    {
        char chr = (char)Serial.read();
        if(chr != '\n')
        {
            if(chr != '\r')
                inputString+= chr;
        }
        else if(inputString.length() > 0)
        {
            // Parse command
            char cmd = toupper(inputString[0]);
            String param;
            int pos = 1;
            while(pos < inputString.length() && inputString[pos] == ' ') ++pos;
                param = inputString.substring(pos);

            // Execute command
            if(cmd >= '0' && cmd < '8') // Servo
            {
                int i = int(cmd) - int('0');
                int angle = param.toInt();
                angles[i] = angle;
            }
            else if(cmd == 'R')        // Reset
            {
                for(int i = 0; i < 8; ++i)
                    angles[i] = defaultAngles[i];
            }
            else if(cmd == 'C')        // Commit
            {
                for(int i = 0; i < 8; ++i)
                    servos[i].write(offsetAngles[i] + angles[i]);
            }

            inputString = "";
        }
    }
}
Control program
The Raspberry Pi Zero W, on which I installed a Raspbian lite distribution, runs a Python program implementing the walk cycle.
As a side note, since the PI Zero W only features Wifi as network interface, headless setup (without a screen) can be a bit tricky, but the process is actually far from cumbersome if you follow the right steps:
- Put the SD card in your computer
- Write the image file: # dd if=raspbian-stretch-lite.img of=/dev/mmcblk0 bs=4096
- Mount the boot partition: # mkdir /mnt/boot && mount /dev/mmcblk0p1 /mnt/boot
- Put an empty ssh file to enable SSH: # touch /mnt/boot/ssh
- Put a /mnt/boot/wpa_supplicant.conf file with the following content to enable Wifi:
ctrl_interface=DIR=/var/run/wpa_supplicant GROUP=netdev
update_config=1
country=FR

network={
    ssid="NETWORK_NAME"
    psk="NETWORK_KEY"
}
- Unmount the partition: # umount /dev/mmcblk0p1
- Put the SD card in the Raspberry Pi. On boot, it should connect to the Wifi network, and you can then connect to it via SSH using its IP address, which can be retrieved from your router DHCP server's device list. The default user is pi and the default password is raspberry. You should of course change it quickly.
Now, back to business: the Python control program sends the servo angles to the Arduino board via the serial link. Especially, the Control class encapsulates the different moves.
class Control:

    def __init__(self, device = '/dev/serial0', baudrate = 9600):
        self.ser = serial.Serial(device, baudrate)

    # leg angle > 0 => down
    def leg(self, i, angle):
        self.move(i, 90+angle if i < 2 else 90-angle)

    # hip angle > 0 => front
    def hip(self, i, angle):
        self.move(4+i, 90+angle if i < 2 else 90-angle)

    def move(self, servo, angle):
        if servo >= 0 and servo < 8:
            angle = min(max(angle, 0), 180)
            self.send('{:s}{:d}'.format(chr(ord('0')+servo), int(angle)))

    def commit(self):
        self.send('C')

    def send(self, command):
        self.ser.write((command + '\n').encode())

    def walk(self, forward, sideward, rotation):
        fu = [1, 1, 1, 1]
        su = [-1, 1, 1, -1]
        ru = [1, 1, -1, -1]
        v = [f*forward + s*sideward + r*rotation for f, s, r in zip(fu, su, ru)]
        self._pattern2(20, -5, v, 0.2)
Eventually, we need the actual walk cycle. It takes four parameters:
- ldown: the knee angle when a leg is down
- lup: the knee angle when a leg is up
- hangles: the ankle angles vector describing each leg contribution
- step: the step duration in seconds
Each step consists in two different legs position. For each position, we apply new angles for the ones that need to be changed, we commit the new angles, and we sleep.
def _pattern2(self, ldown, lup, hangles, step):
    self.leg(0, lup)
    self.leg(1, ldown)
    self.leg(2, ldown)
    self.leg(3, lup)
    self.commit()
    time.sleep(step/2)

    self.hip(0, hangles[0])
    self.hip(1, 0)
    self.hip(2, 0)
    self.hip(3, hangles[3])
    self.commit()
    time.sleep(step/2)

    self.leg(0, ldown)
    self.leg(3, ldown)
    self.commit()
    time.sleep(step/2)

    self.hip(0, 0)
    self.hip(1, - hangles[1])
    self.hip(2, - hangles[2])
    self.hip(3, 0)
    self.commit()
    time.sleep(step/2)

    self.leg(0, ldown)
    self.leg(1, lup)
    self.leg(2, lup)
    self.leg(3, ldown)
    self.commit()
    time.sleep(step/2)

    self.hip(0, 0)
    self.hip(1, hangles[1])
    self.hip(2, hangles[2])
    self.hip(3, 0)
    self.commit()
    time.sleep(step/2)

    self.leg(1, ldown)
    self.leg(2, ldown)
    self.commit()
    time.sleep(step/2)

    self.hip(0, - hangles[0])
    self.hip(1, 0)
    self.hip(2, 0)
    self.hip(3, - hangles[3])
    self.commit()
    time.sleep(step/2)
Remote control
For now, the robot will be connected to Wifi and configured to be remotely accessible via a web browser. The web page will display the video feedback and allow to control the robot.
To this end, we'll combine a few components:
- Flask Python framework to create an app hosting the control code
- NGINX HTTP server as a TLS endpoint and reverse proxy
- gstreamer to setup a video streaming pipeline
- Janus WebRTC Gateway to enable the browser to stream the realtime video via WebRTC
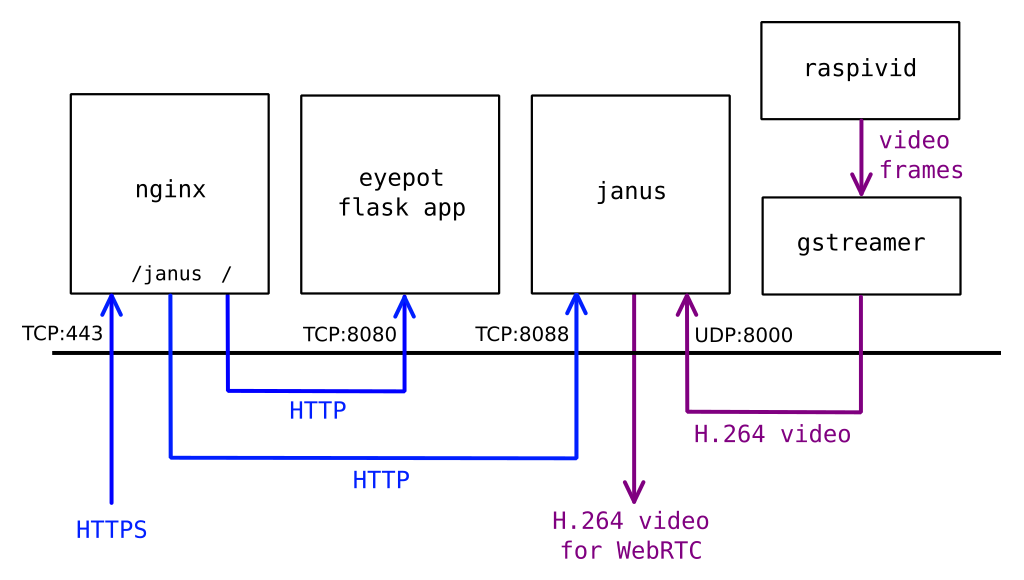
Schematic of the relation between software components inside the Eyepot
First of all, let's change the hostname to eyepot:
$ sudo hostnamectl set-hostname eyepot
For security reasons, modern browsers will refuse to run WebRTC sessions on a page from an unsecure origin (the reason is anyone on the network could inject JavaScript code to listen to your microphone or webcam). The issue for us is that this rule is also enforced on a local network. Therefore, we need to generate a TLS certificate and deploy a HTTPS server.
You can generate a self-signed TLS X.509 certificate with openssl:
$ openssl req -x509 -newkey rsa:4096 -days 365 -nodes -keyout eyepot.key -out eyepot.pem -subj '/CN=eyepot'
Here I'm using NGINX as a font-end HTTPS server, but another server with support for proxy pass like Apache or Lighttpd would work too.
$ sudo apt install nginx-light
Once nginx is installed, we have to configure it as a reverse proxy for Janus (listening on port 8088) and our Flask app (listening on port 8080), and enable SSL/TLS, in /etc/nginx/sites-enabled/default:
server {
    listen 80 default_server;
    listen [::]:80 default_server;

    listen 443 ssl default_server;
    listen [::]:443 ssl default_server;

    server_name eyepot;

    ssl_certificate     eyepot.pem;
    ssl_certificate_key eyepot.key;

    location /janus {
        proxy_pass http://localhost:8088;
    }

    location / {
        proxy_pass http://localhost:8080;
    }
}
We can now start nginx:
$ sudo systemctl enable nginx
$ sudo systemctl start nginx
Janus is not available in Debian Stretch, on which Raspbian is currenty based. Therefore, let's compile and install Janus by following the instructions. We don't need support for WebRTC data channels here so installing usrsctp is not required.
$ sudo apt install git build-essential libmicrohttpd-dev libjansson-dev libnice-dev libssl-dev libsrtp-dev libsofia-sip-ua-dev libglib2.0-dev libopus-dev libogg-dev libcurl4-openssl-dev liblua5.3-dev pkg-config gengetopt libtool automake
There is a bit of a setback here: Debian Stretch ships version 1.4.5 of libsrtp, however Janus requires version 1.5.x, 1.6.x, or 2.x. Therefore, we have to compile it manually.
$ sudo apt purge libsrtp0 libsrtp0-dev
$ wget https://github.com/cisco/libsrtp/archive/v2.1.0.tar.gz
$ tar xfv v2.1.0.tar.gz
$ cd libsrtp-2.1.0
$ ./configure --enable-openssl --prefix=/usr/local
$ make shared_library
$ sudo make install
$ cd ..
We can then properly install Janus.
$ git clone https://github.com/meetecho/janus-gateway.git
$ cd janus-gateway
$ sh autogen.sh
$ ./configure --disable-docs --prefix=/usr/local
$ make
$ sudo make install
$ sudo cp -r /usr/local/etc/janus /etc/
Janus binds by default on port 8088 for HTTP. We will use its streaming plugin to stream the video, therefore, after installation, we need to register our video source in the config file /etc/janus/janus.plugin.streaming.cfg:
[gst-rpi]
type = rtp
id = 1
description = Raspberry Pi H264 streaming
audio = no
video = yes
videoport = 8000
videopt = 100
videortpmap = H264/90000
videofmtp = profile-level-id=42e028\;packetization-mode=1
We can now start Janus in background:
$ janus -F /etc/janus &
Now, we need to actually stream the video encoded in H.264 on port 8000. The raspivid program captures the video from the Raspberry Pi camera and the "-o -" option outputs the H.264 frames on the standard output. We can then pipe them into a gstreamer pipeline to packetize the video and finally send it on UDP port 8000. The parameters on raspivid result from a bit of empirical tuning, in particular intra, that specifies the number of frames between keyframes: if it's too high, the video tends to suffer from random freezes in Chrome.
Note that gst-launch is supposed to be a debug tool, and we should actually create a program using the gstreamer lib. However, this is way sufficient for our needs here.
$ raspivid -n -t 0 -w 640 -h 480 -fps 30 -b 2000000 --profile baseline --intra 15 -o - | gst-launch-1.0 -v fdsrc ! h264parse ! rtph264pay config-interval=1 pt=100 ! udpsink host=127.0.0.1 port=8000 sync=false &
In the web page we send to the browser, after importing janus.js, streaming.js for the streaming plugin and adapter.js for the WebRTC adapter requiered by Janus, we need to configure the Janus session. Here is a simplified version without error handling:
// Initialize the library
Janus.init({debug: "all", callback: function() {
    // Make sure the browser supports WebRTC
    if(!Janus.isWebrtcSupported()) {
        alert("No WebRTC support");
        return;
    }
    // Create session
    var janus = new Janus({
        server: window.location.protocol + "//" + window.location.host + "/janus",
        success: function() {
            // Attach to streaming plugin
            janus.attach({
                plugin: "janus.plugin.streaming",
                opaqueId: Janus.randomString(12),
                success: function(pluginHandle) {
                    var streaming = pluginHandle;
                    var body = { "request": "watch", id: 1 };
                    streaming.send({ "message": body });
                },
                onmessage: function(msg, jsep) {
                    if(jsep !== undefined && jsep !== null) {
                        // Answer
                        streaming.createAnswer({
                            jsep: jsep,
                            media: { audioSend: false, videoSend: false }, // Receive only
                            success: function(jsep) {
                                var body = { "request": "start" };
                                streaming.send({"message": body, "jsep": jsep});
                            },
                        });
                    }
                },
                onremotestream: function(stream) {
                    var videoElement = document.getElementById("video");
                    Janus.attachMediaStream(videoElement, stream);
                },
            });
        },
    });
}});
We also need to send the control state depending on what button or key is pressed. We'll use a very simple API with a POST on the route /move:
var message = JSON.stringify({
    'state': state,
});
var xhr = new XMLHttpRequest();
xhr.open('POST', '/move');
xhr.setRequestHeader('Content-Type', 'application/json');
xhr.send(message);
Eventually, we can write the Flask app to receive the control state. It is passed to a thread that loops on the current state. As a reminder, you can find the entire Flask app with the rest of the source code for the project on GitHub.
import control
import controlthread

from flask import Flask, request, Response, send_file, url_for

app = Flask(__name__)
app.config.from_object(__name__)

ctrl = control.Control('/dev/serial0', 9600)
ctrlThread = controlthread.ControlThread(ctrl)
ctrlThread.start()

@app.route('/', methods=['GET'])
def home():
    return send_file('static/index.html')

@app.route('/move', methods=['POST'])
def move():
    data = request.get_json()
    ctrlThread.state = data["state"] if data["state"] else 'idle'
    return Response('', 200)
With everything else running in backgound, we can now start the app with
$ python3 app.py
Then, by pointing a WebRTC-compatible browser like Firefox or Chromium on https://eyepot/, we can control the robot with video feedback!
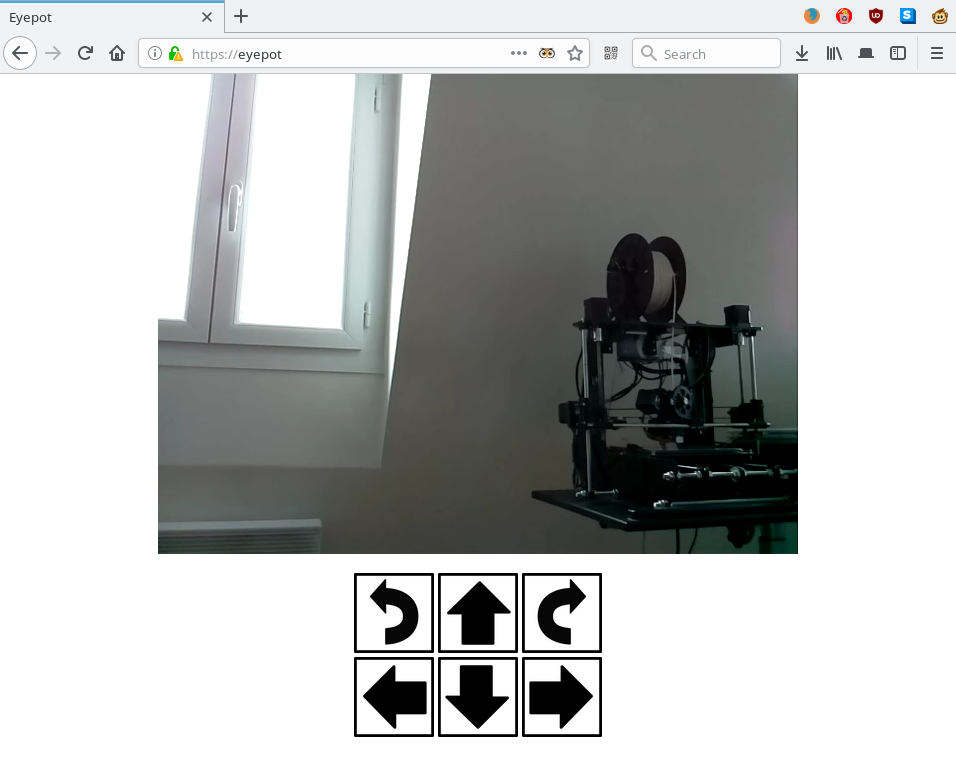
The control webpage of the Eyepot
The Eyepot creepily walking around
EDIT: Any comments? You can join the discussion on reddit r/raspberry_pi!

