My network setup at home is surprisingly pretty common: a DSL modem (VDSL2 actually) followed by a router featuring an ethernet switch and an 802.11n Wifi access point, configured as a NAT gateway.
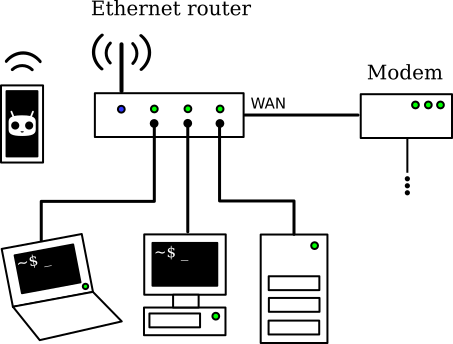
My home network setup before modifications
Let's imagine I'm in a country that doesn't care about the right to private life of its citizens and performs automated mass surveillance, on the pretext of fighting against terrorism or copyright infringement. A gloomy perspective for sure, but let's keep that as our work hypothesis, for what the future holds in store.
Of course, I could just set up on every computer a VPN whose gateway happens to be in a foreign and more respectful country. However, multiple VPNs on multiple computers are a highly impractical setup for various reasons:
- VPN configuration has to be done multiple times, and I'm allergic to repetitive tasks
- The maximum number of concurrent connections is restricted by VPN service providers
- Access to resources on a local network at the same time is a hassle and need specific configuration, like DNS settings
So, why not install the VPN once and for all in a privacy-enhancing gateway? We will implement it in a clean, IPv6-compatible manner so we even have public addresses working on the hosts.
Our goal is to get a smart gateway behaving as follows:
- Outgoing connections are routed through the VPN. We have to use Network Address Translation since the VPN provider only attributed us one IPv4 address and one IPv6 address.
- Incoming connections are routed normally to the LAN, so we get IPv4 port forwarding and working IPv6 public addresses.
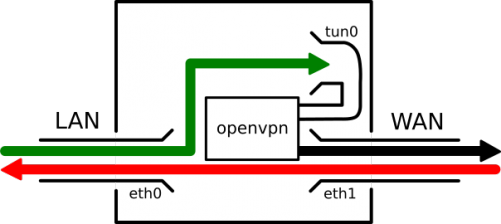
Packet streams inside the smart gateway
We will use OpenVPN, so any serious VPN provider supporting the corresponding protocol and IPv6 will work. I recommend Mullvad, since they accept Bitcoin payment, which is rather handy, but a lot of other services are good too. As a side note, using an IPv4-only VPN client on an IPv6-enabled network without tampering with the settings will lead to IPv6 leakage, completely disclosing a part of your traffic.
Remember this is just a technical example, follow it at your own risk. I do not encourage illegal activities and I am not in any way liable to any damages caused by a setup inspired from this article.
First, let's use the ethernet router as a simple switch and put a Linux box with two ethernet interfaces - simply use a USB ethernet dongle if you have only one - between this ethernet switch and the LAN.
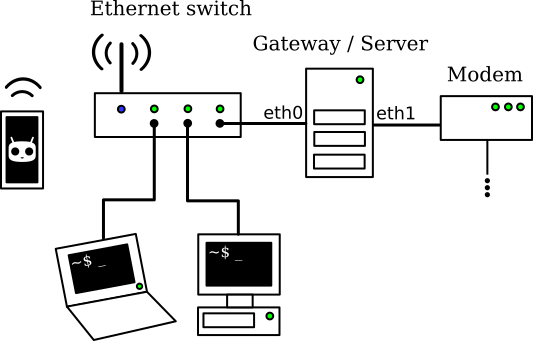
My home network setup with the gateway in place
There is a trick here: the switch is actually a router with no WAN network. It runs dnsmasq so it acts as a DHCPv4 and a DNS server on the LAN, but the IPv4 gateway it advertises is not itself anymore but the actual new gateway. We could install dnsmasq on the new gateway, but this scheme allows for a simpler configuration, and DNS requests will automatically be redirected through the VPN.
Mine is flashed with OpenWRT, here are the corresponding configuration sections.
[...]

config interface 'lan'
        [...]
        option proto 'static'
        option netmask '255.255.255.0'
        option ip6assign '64'
        option ipaddr '192.168.0.254'
        option gateway '192.168.0.1'
        option broadcast '255.255.255.0'
        option dns '9.9.9.9 149.112.112.112' # Quad9 recursive resolvers
[...]

config dhcp 'lan'
        option interface 'lan'
        option start '100'
        option limit '150'
        option leasetime '24h'
        list dhcp_option '6,192.168.0.254' # DNS server
        list dhcp_option '3,192.168.0.1'   # Gateway
        list dhcp_option '119,local'       # Local domain
        [...]
I assume here you get IPv4 addressing from your ISP with DHCPv4 and IPv6 addressing on a /64 through IPv6 Stateless Address Autoconfiguration (SLAAC). From experience it seems to be a pretty common setup nowadays, if your ISP is not one of those blatantly incompetent ones that have not even deployed IPv6 yet.
First step, set up the VPN service on the gateway. Follow the instructions given by the VPN provider, but basically you should get a config file, e.g. vpn.conf, along with certificates and a private key to put in /etc/openvpn/. Be sure to configure UDP as transport protocol for OpenVPN, TCP over TCP is an ugly thing.
Second step, configure the gateway. The preliminary requirement is of course setting the interfaces. My box runs Debian GNU/Linux, so I use the Debian-specific network configuration file, but you can adapt it easily to any Linux distribution. Note I have chosen static IPv6 configuration, but you could get away with SLAAC on eth1.
# The loopback network interface
auto lo
iface lo inet loopback

# The LAN network interface
allow-hotplug eth0

iface eth0 inet static
address 192.168.0.1
netmask 255.255.255.0

iface eth0 inet6 static
address 2001:X:X:X:X:X:X:X # IPv6 address eth1 (not eth0) would get through SLAAC
netmask 64

# The WAN network interface
allow-hotplug eth1

iface eth1 inet dhcp

iface eth1 inet6 static
address 2001:X:X:X:X:X:X:X # IPv6 address eth1 would get through SLAAC
netmask 128                # We don't want Linux looking for neighbours there
gateway fe80::X:X:X:X      # Link local address to the ISP's gateway
Apply the new network configuration:
# service networking restart
Now, we have to enable IPv4 and IPv6 forwarding, set Reverse Path Filter to loose mode so it doesn't mess with our setup, and enable Neighbour Discovery Protocol Proxy for IPv6. To do so, edit /etc/sysctl.conf
# IPv4 forwarding
net.ipv4.ip_forward=1
net.ipv4.conf.default.forwarding=1
net.ipv4.conf.eth0.forwarding=1
net.ipv4.conf.eth1.forwarding=1

# IPv4 Reverse Path Filter to loose mode
net.ipv4.conf.default.rp_filter=2
net.ipv4.conf.eth0.rp_filter=2
net.ipv4.conf.eth1.rp_filter=2

# IPv6 forwarding
net.ipv6.conf.default.forwarding=1
net.ipv6.conf.eth0.forwarding=1
net.ipv6.conf.eth1.forwarding=1

# IPv6 NDP proxy
net.ipv6.conf.eth0.proxy_ndp=2
net.ipv6.conf.eth1.proxy_ndp=2
Now load these new settings:
# sysctl -p
In order to enable SLAAC for hosts on the LAN, we need to install and configure radvd on the gateway's LAN interface to broadcast the IPv6 public prefix. After installing the program, add the following in /etc/radvd.conf, where 2001:X:X:X::/64 is your IPv6 prefix.
interface eth0
{
  AdvSendAdvert on;
  prefix 2001:X:X:X::/64
  {
  };
};
# service radvd start
Then, we set up iptables and ip6tables to get a standard NAT configuration between LAN and WAN. We add a couple lines to the mangle table to save and restore packet marks so every packet on a single connection has the same mark, I will explain why at the next step. Note that with this configuration, IPv4 Internet access should work normally.
#!/bin/sh

LAN_DEV=eth0
WAN_DEV=eth1

# Default policies
iptables -P OUTPUT ACCEPT
iptables -P INPUT DROP
iptables -P FORWARD ACCEPT

ip6tables -P OUTPUT ACCEPT
ip6tables -P INPUT DROP
ip6tables -P FORWARD ACCEPT

iptables -A INPUT -i lo -j ACCEPT                                # Allow from loopback
iptables -A INPUT -i $LAN_DEV -j ACCEPT                          # Allow from LAN
iptables -A INPUT -m state --state ESTABLISHED,RELATED -j ACCEPT # Allow established
iptables -A INPUT -p icmp -j ACCEPT                              # Allow ICMP (e.g. ping)

ip6tables -A INPUT -i lo -j ACCEPT
ip6tables -A INPUT -i $LAN_DEV -j ACCEPT
ip6tables -A INPUT -m state --state ESTABLISHED,RELATED -j ACCEPT
ip6tables -A INPUT -p icmpv6 -j ACCEPT # Mandatory for neighbour discovery

# NAT
iptables -t nat -A POSTROUTING -o $WAN_DEV -j MASQUERADE

# Alternatively, if you have a static IP4 (and so a good ISP), SNAT is better
#iptables -t nat -A POSTROUTING -o $WAN_DEV -j SNAT --to-source $WAN_IP4

# Save packet marks with connection tracking
iptables -t mangle -A PREROUTING  -j CONNMARK --restore-mark
iptables -t mangle -A POSTROUTING -j CONNMARK --save-mark

ip6tables -t mangle -A PREROUTING  -j CONNMARK --restore-mark
ip6tables -t mangle -A POSTROUTING -j CONNMARK --save-mark

# Allow access to some services on this machine from the WAN
iptables  -A INPUT -i $WAN_DEV -p tcp --dport 22 -j ACCEPT  # SSH IPv4
ip6tables -A INPUT -i $WAN_DEV -p tcp --dport 22 -j ACCEPT  # SSH IPv6
iptables  -A INPUT -i $WAN_DEV -p tcp --dport 80 -j ACCEPT  # HTTP IPv4
ip6tables -A INPUT -i $WAN_DEV -p tcp --dport 80 -j ACCEPT  # HTTP IPv6
iptables  -A INPUT -i $WAN_DEV -p tcp --dport 443 -j ACCEPT # HTTPS IPv4
ip6tables -A INPUT -i $WAN_DEV -p tcp --dport 443 -j ACCEPT # HTTPS IPv6

exit 0
# chmod +x ./iptables.sh
# ./iptables.sh
We will need a specific routing table for traffic destined to go through the VPN, and we have to register it before continuing:
# echo "10 vpn" >> /etc/iproute2/rt_tables
Next, we add a VPN startup script /etc/openvpn/vpn_up.sh to start routing outgoing connections through the VPN as soon as it is connected.
#!/bin/sh

# Get the dev name from openvpn
DEV=$1

# LAN settings
LAN_DEV=eth0
LAN_NET4=192.168.0.0/24
LAN_NET6=2001:X:X:X::/64

# Get IPv4 network address range and gateway for the VPN
# This works for Mullvad, but you might have to modify it depending on the masks
IP4=$(ip -4 addr show dev $DEV | awk '/inet/&&/global/{print $2}')
NET4=${IP4%\.*\.*}.0.0/16
GATEWAY4=${IP4%\.*\.*}.0.1

# VPN routing table
ip -4 rule add from $LAN_IP4 lookup vpn priority 1000
ip -4 route add $NET4 dev $DEV
ip -4 route add $NET4 dev $DEV table vpn
ip -4 route add $LAN_NET4 dev $LAN_DEV table vpn
ip -4 route add default via $GATEWAY4 dev $DEV table vpn

ip -6 rule add from $LAN_IP6 lookup vpn priority 1000
ip -6 route add $LAN_NET6 dev $LAN_DEV table vpn
ip -6 route add default dev $DEV table vpn

# Packets marked 10 are never routed through the VPN
ip -4 rule add fwmark 10 lookup main priority 100
ip -6 rule add fwmark 10 lookup main priority 100

# NAT to the VPN
iptables  -t nat -A POSTROUTING -s $LAN_NET4 -o $DEV -j MASQUERADE
ip6tables -t nat -A POSTROUTING -s $LAN_NET6 -o $DEV -j MASQUERADE

# Prevent routing established public connections through the VPN by setting mark 10
# Remember we used CONNMARK so all packets from the same connection are also marked
# The IPv4 part might seem useless, but it's necessary if we want to forward a service
iptables  -t mangle -A PREROUTING ! -i $DEV -d $LAN_NET4 -j MARK --set-mark 10
ip6tables -t mangle -A PREROUTING ! -i $DEV -d $LAN_NET6 -j MARK --set-mark 10

# You can prevent a service from going through the VPN like this
# Example: Prevent VPN through VPN
iptables  -t mangle -A PREROUTING -s $LAN_IP4 -p udp --dport 1194 -j MARK --set-mark 10
ip6tables -t mangle -A PREROUTING -s $LAN_IP6 -p udp --dport 1194 -j MARK --set-mark 10

# Enable forwarding, just to be sure
sysctl -w net.ipv4.conf.${DEV}.forwarding=1
sysctl -w net.ipv6.conf.${DEV}.forwarding=1

exit 0
Don't forget to make it executable:
# chmod +x /etc/openvpn/vpn_up.sh
And declare it in the vpn.conf config file:
[...]

# Scripts
up /etc/openvpn/vpn_up.sh
Now start openvpn (Don't forget to edit /etc/default/openvpn first on Debian), and let the magic happen...
# service openvpn start
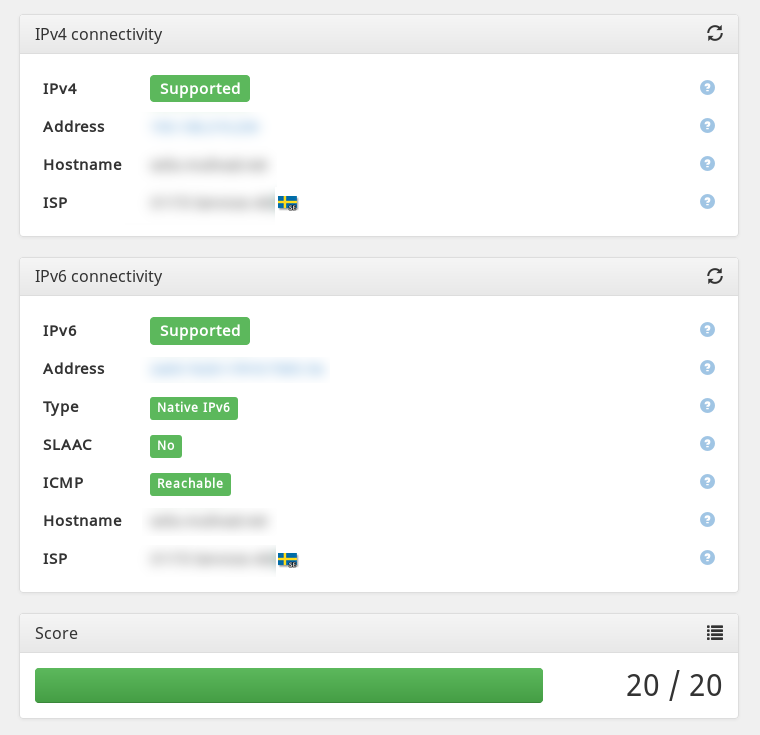
It works! Note outgoing connections use IPv4 and IPv6 adresses in Sweden. Yay for the winner of Eurovision 2015 :P
But there is a catch: incoming IPv6 connections do not get through to the LAN... Because we forgot to proxy IPv6 neighbours! What we would like to use is something like ip -6 neigh add proxy 2001:X:X:X::/64 dev eth1 to have the kernel answer neighbour requests coming from the ISP's gateway for hosts on the LAN. Sadly, it doesn't seem to exist, you can proxy a unique host but not an address range.
Yet, we can hack around this irritating issue with a script to do the job. It works, but it might not be the best practice. If a network guru comes around and has a better way... feel free to comment!
For now, let's write a custom /root/proxyprefix.sh
#!/bin/sh

PREFIX=$1
DEV1=$2
DEV2=$3

# List every neighbour address on DEV1 and proxy it on DEV2
ip -6 neigh show | awk '/'$PREFIX'.*'$DEV1'/{print $1}' |
while read IP6
do
        ip -6 neigh add proxy $IP6 dev $DEV2
done

exit 0
# chmod +x /root/proxyprefix.sh
It has to be run at regular intervals, one way to do so is to add it to the crontab with crontab -e
# m h  dom mon dow   command
* * * * * /root/proxyprefix.sh 2001:X:X:X eth0 eth1
It should work perfectly and make the hosts on the LAN reachable using IPv6. If you want, you can add some firewall rules for incoming connections (on the FORWARD chain).
For IPv4, forwarding a port is done the normal way with DNAT:
# iptables -t nat -A PREROUTING -i eth1 -p tcp --dport $MYPORT -j DNAT --to-destination $MYHOST
Once everything is working, don't forget to set the firewall and NAT configuration to load at startup. A cleaner way to do it would be to use iptables-save and iptables-restore.
# mv ./iptables.sh /etc/network/if-pre-up.d/iptables
How about a nice cup of tea to celebrate?

